How to record system audio on a Mac without BlackHole
Pick the route that matches the file you actually need. Updated August 2026.
For microphone-only audio, use QuickTime Player. For a screen video with desktop audio, use OBS Studio. For a free audio-routing setup, use BlackHole. If you want one local audio file containing Mac audio, a microphone or both, use a recorder built on Apple's native capture APIs.
Short answer
Which method should you use?
- Microphone onlyQuickTime Player - built in and free
- Screen video + system audioOBS Studio - free, with per-app capture
- Free audio routingBlackHole - flexible, but requires device setup
- Audio-only system + microphonePX7 Audio Recorder - direct, local capture
The important distinction is between an input and the sound playing on the Mac. QuickTime's audio recorder can select a microphone or another input device, but it does not offer Mac system audio as a source. Modern Mac apps can capture system audio through Apple's ScreenCaptureKit or Core Audio APIs after you grant permission, so a virtual audio driver is no longer the only route.
Built in
Use QuickTime Player when you only need a microphone
- Open QuickTime Player and choose File > New Audio Recording.
- Open the menu beside the record button and choose the built-in microphone, a USB microphone or an audio interface.
- Choose High for AAC or Maximum for uncompressed 24-bit audio, then press Record.
This is the shortest path for voice notes and external inputs. Apple's own QuickTime guide lists microphone and quality choices, but no system-audio source. Apple's Screenshot toolbar has the same limitation for audio: its recording option is a microphone. Use it when the screen matters and microphone audio is enough.
Free and capable
Use OBS Studio when you need video or per-app capture
- Install OBS Studio 30 or later on macOS 13 or later.
- Add a macOS Audio Capture source for desktop audio or one application.
- Add an Audio Input Capture source if you also need a microphone.
- Check both meters, make a short test, then start the recording.
OBS is the strongest free option when you need scenes, video, streaming, separate sources or per-application control. Its official macOS audio guide confirms that current versions can capture all desktop audio or a chosen app without a virtual device. The tradeoff is an interface designed for production and streaming rather than a quick audio-only take.
Free audio routing
Use BlackHole when you want a virtual device
- Install BlackHole 2ch and restart audio applications when prompted.
- In Audio MIDI Setup, create a Multi-Output Device containing BlackHole and your speakers or headphones.
- Select that Multi-Output Device as the Mac's output.
- Select BlackHole as the input in QuickTime, Audacity or another recorder.
BlackHole is open source, supports Intel and Apple silicon, and works with applications that can record an ordinary input device. Its own documentation explains the routing: the sending app outputs to BlackHole and the recording app receives from it. A Multi-Output Device is what lets you keep hearing the sound while it is routed to the recorder.
Choose this route when zero cost and routing flexibility matter more than setup time. Remember to restore your normal output device afterwards.
Audio only, no routing
Use PX7 Audio Recorder for a direct local take
PX7 Audio Recorder captures Mac audio through Apple's native APIs and can combine it with one Core Audio input in the same recording. Choose Mac audio, microphone or both, watch the live meters, and save WAV, AIFF, CAF or M4A. It does not install a virtual driver, upload audio or require an account.
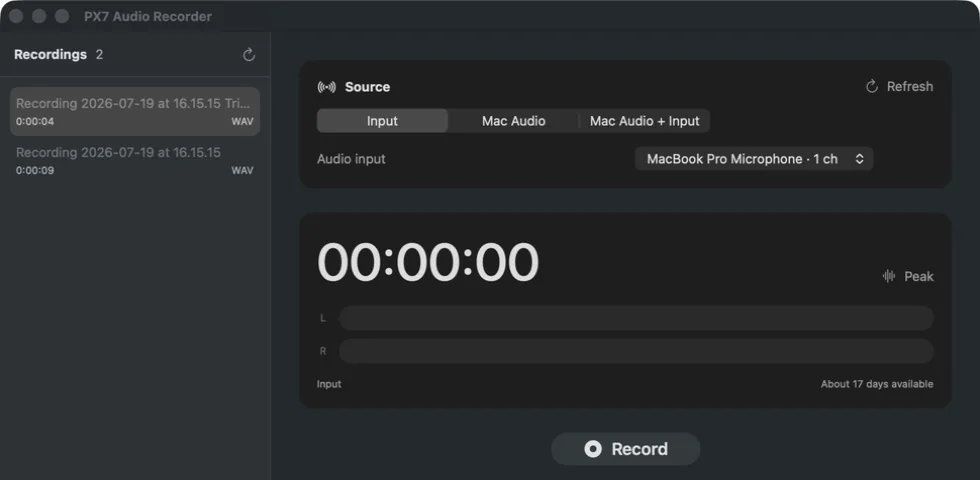
It costs €19 once after a seven-day trial and requires macOS 14.2 or later on Apple silicon or Intel. It is not the right choice if you need per-application source selection, separate tracks, streaming scenes or a free tool; use BlackHole or OBS for those cases.
Homebrew install from the public PX7 cask:
brew install --cask px7digital/tap/px7-audio-recorderBefore the real take
Run a 20-second test
- Play the exact app or browser source you intend to record.
- Speak into the selected microphone if it is part of the take.
- Check that both meters move and do not clip.
- Stop, play the file back, and confirm the destination and format.
This catches the failures that matter: the wrong input, a silent system source, feedback, clipping or an unexpected save location. Also make sure you have permission to record calls, meetings and copyrighted material; consent and copyright rules depend on what and where you record.
Quick answers
Mac system-audio recording questions
Can QuickTime Player record Mac system audio?
No. QuickTime Player's audio recorder accepts a microphone or another audio input, but it does not offer the sound playing on the Mac as a source.
Can I record Mac system audio without BlackHole?
Yes. On current macOS versions, apps can capture system audio through Apple's native audio APIs after you grant permission, without installing or routing through a virtual device.
Can OBS record Mac desktop audio without BlackHole?
Yes. OBS Studio 30 or later on macOS 13 or later can capture all desktop audio or one application with its macOS Audio Capture source.
How do I record Mac system audio and a microphone together?
Use an app that combines a native system-audio source with a Core Audio input, or combine BlackHole and the microphone in an Aggregate Device. Test both meters before the real take.
PX7 Digital makes PX7 Audio Recorder, so this guide is not neutral. The Apple, OBS and BlackHole capabilities above come from their linked documentation, checked on 27 August 2026. Tell us if a step has changed.